Building My Active Directory Lab from Scratch: A Step-by-Step Guide for Beginners 🛠️🖥️
Date of authorship: May 16th, 2025
Introduction – Why Build an Active Directory Lab?
When I started this project, I had zero experience with Active Directory (AD). Instead of waiting for a job to teach me these skills, I decided to build a home lab and learn how to set up a domain environment from the ground up. This post is a comprehensive walkthrough of how I set up a domain controller, created workstations, configured static IPs and DNS, and added users — all using VMware Workstation Player, Windows Server 2022, and Windows 10 Pro. My goal? To get hands-on experience and showcase that I can learn and implement these skills independently. My hope is to help others in their journey to learn and build skills to better their understanding and add to their repertoire of tools! I want to thank you for taking the time to visit my portfolio and blog. Without further delay, let’s dive in.
1. Setting Up the Virtual Environment
To build this lab, I needed a platform to run multiple operating systems simultaneously. I chose VMware Workstation Player because it’s free and reliable.
Steps to Install VMware Workstation Player:
- Download VMware Workstation Player from the official VMware website. Choose the latest edition for stability!
- Run the installer and follow the on-screen instructions.
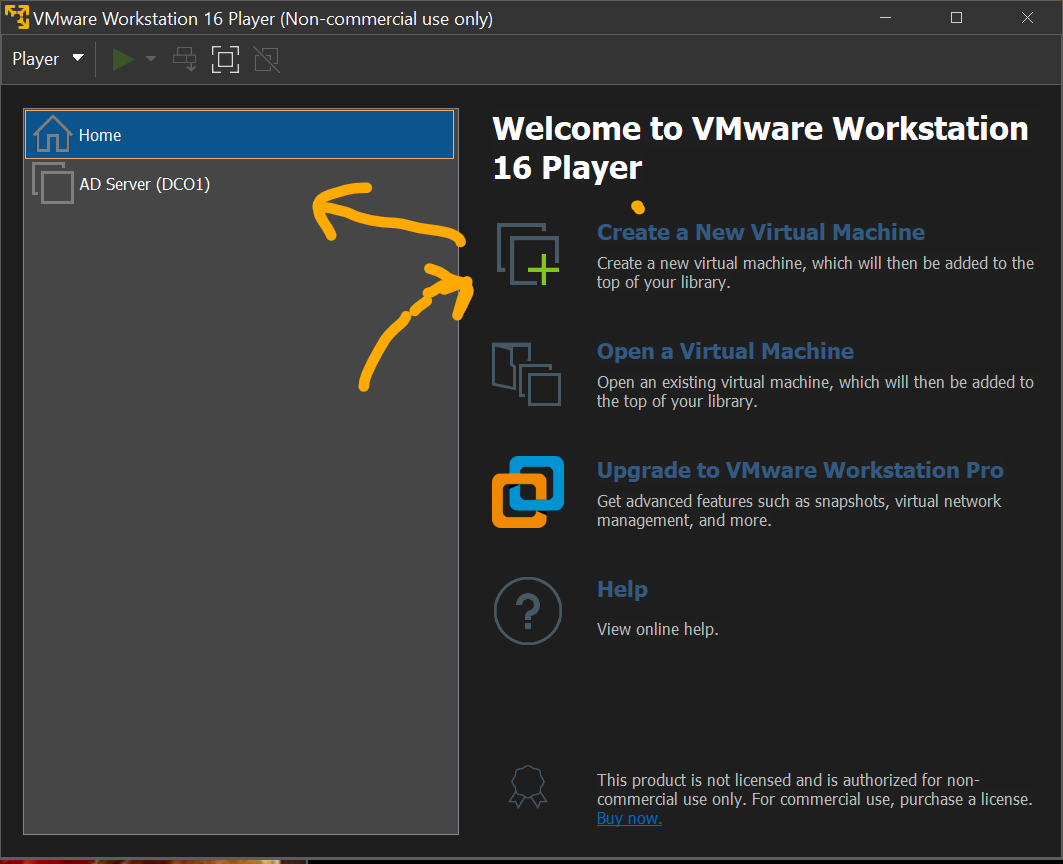
- Once installed, open VMware to verify that it’s functioning properly.
From here, you can see options available, like "Create a New Virtual Machine". We will get to that in a moment!
Keep in mind you will need a few .iso images to install the Operating System (OS) necessary to get this set up! Don't worry - how to get them and use them will be covered in the relevant sections.
2. Configuring the Virtual Network
During VM creation, I configured the network as Host-Only. This setting ensures that all VMs can communicate with each other but remain isolated from the internet — perfect for a controlled lab environment. For my needs, I didn't need internet connection. Just keep this in mind for future projects that you can actually change the way your VM interacts with the internet. Holding your mouse over each option will give you a description of what the setting does.
Even without internet, you'll still be able to set up an Active Directory Domain Services, DNS, and join different machines to your domain - all done locally!
3. Creating the Domain Controller
The domain controller is the backbone of this lab. It handles authentication, DNS, and directory services. We will be creating a VM specifically for this server, installing the Windows Server 2022 OS, configuring it, and then promoting it to Domain Controller. This will give us access to Active Directory features like adding or managing users, adding organizational units (OUs), and group policies for controlling user access, logins and logouts, etc.
Creating the VM that will be our Active Directory Server:
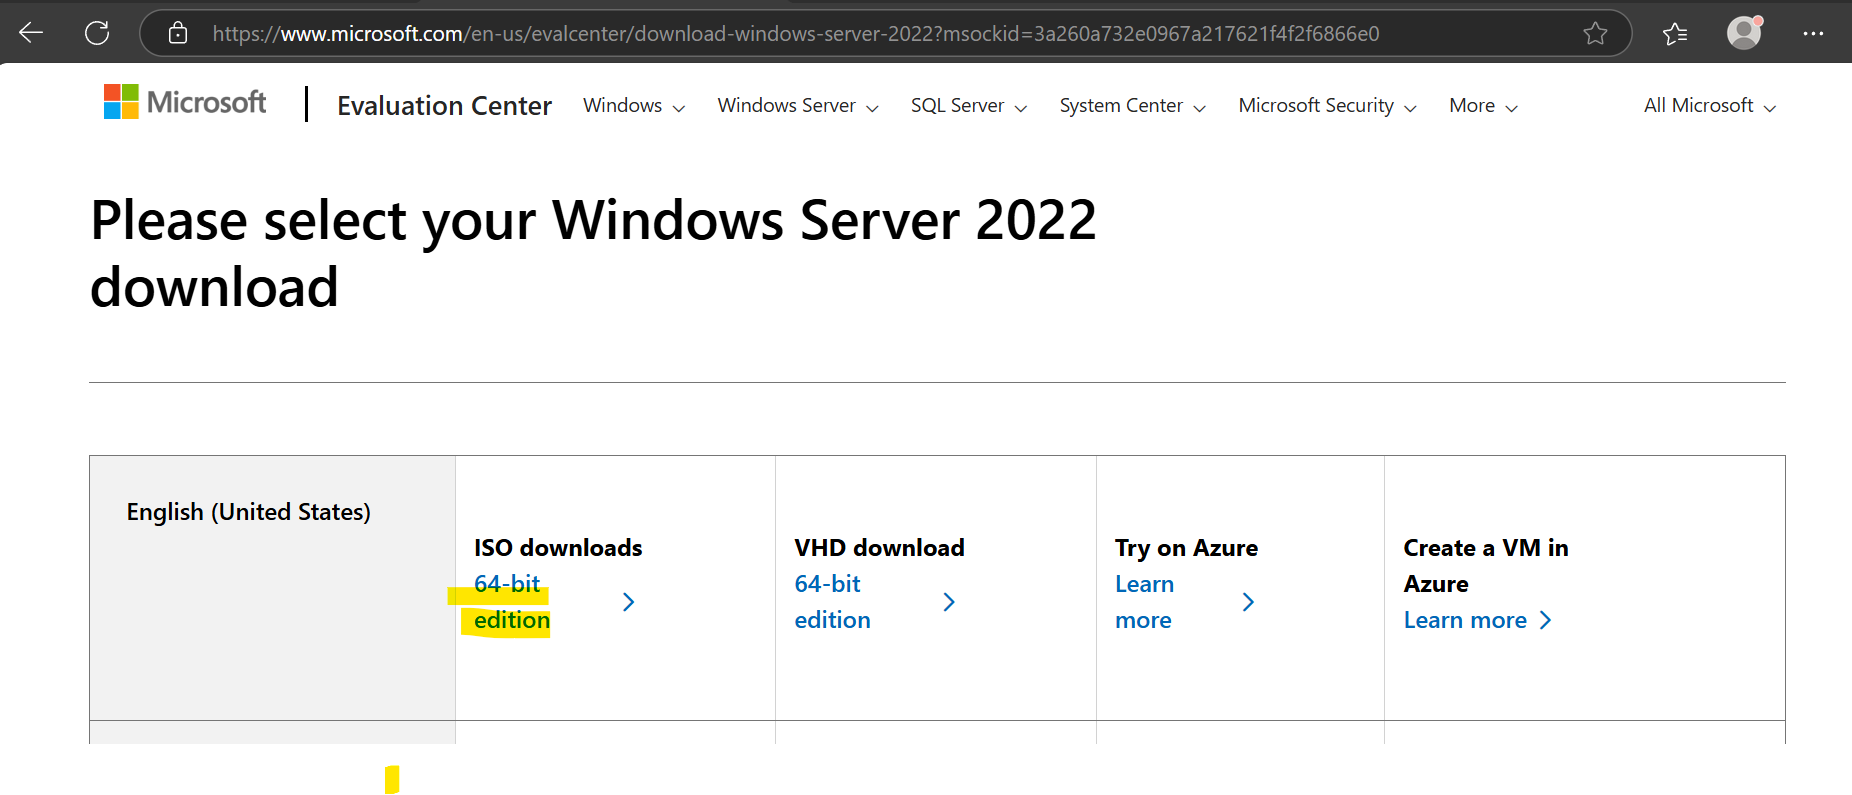
- First, download the OS: Windows Server 2022 (find it at Microsoft’s Evaluation Center - see image below). Give it a quick Google and you'll find it! I used the 64-bit edition.
Installing Windows Server 2022:
- In VMware Workstation Player, choose "Create a New Virtual Machine" and select the ISO you downloaded for Windows Server 2022.
- Next, give your VM a name. I chose to name it "AD Server (DC01)" which, for me, meant Active Directory Server (Domain Controller 01).
- Now, you will select the settings and hardware for your server VM. Storage first, and then customizing the hardware at the end. I recommend these settings:
- Storage: 60 GB - recommended minimum for this server. Select "Store virtual disk as a single file" to make things easier, unless you plan on migrating your VM to another computer.
- Now, on the last screen, select "Customize Hardware".
- RAM: 4 GB. You might get away with 2GB, but 4GB runs smoothest in my experience.
- Network Adapter: Host-Only. This means only local connection - not connected the internet.
- Select "Finish" Your VM should powerup after it writes the disk, and later in your VMware window, you will have a new VM listed:
Installing the OS after VM boots up
Your VM is going to try to boot up, but needs any key pushed to initiate the OS installation. Just make sure you are in the VM window and press any key. You should see a Windows logo pop up to start the OS installation process.
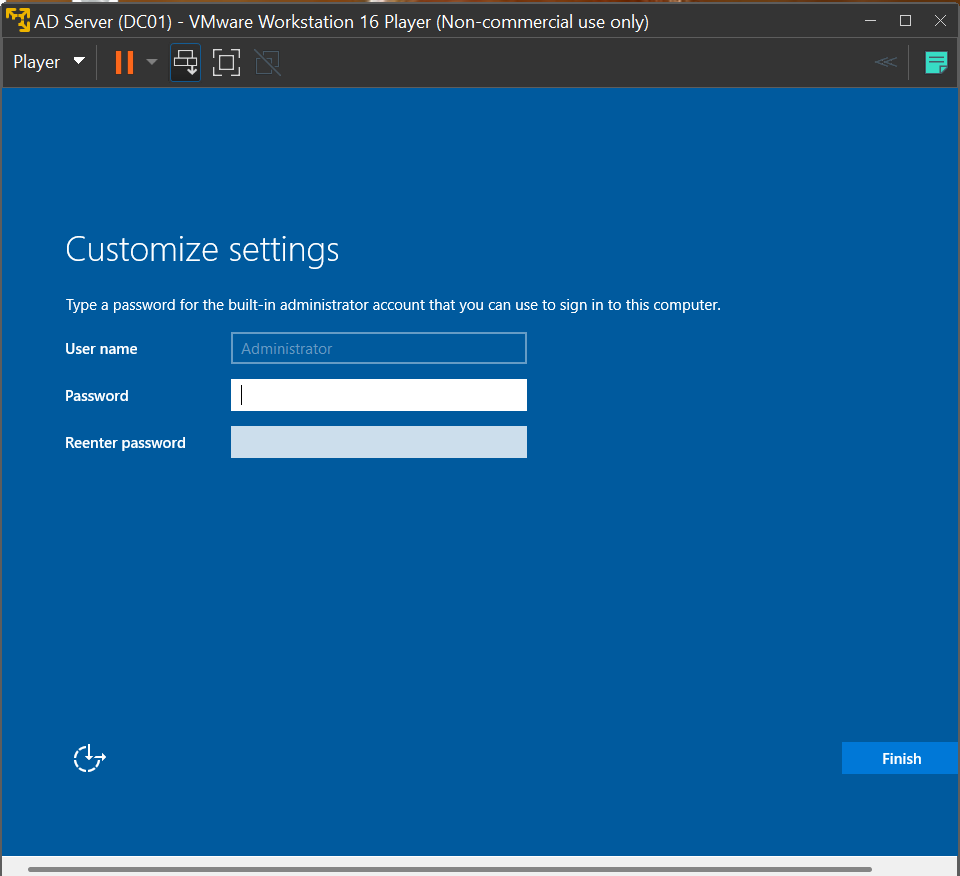
- Choose the edition: Standard with Desktop Experience. This will give us a user interface rather than relying solely on the command line.

- Set up a local admin account and password.
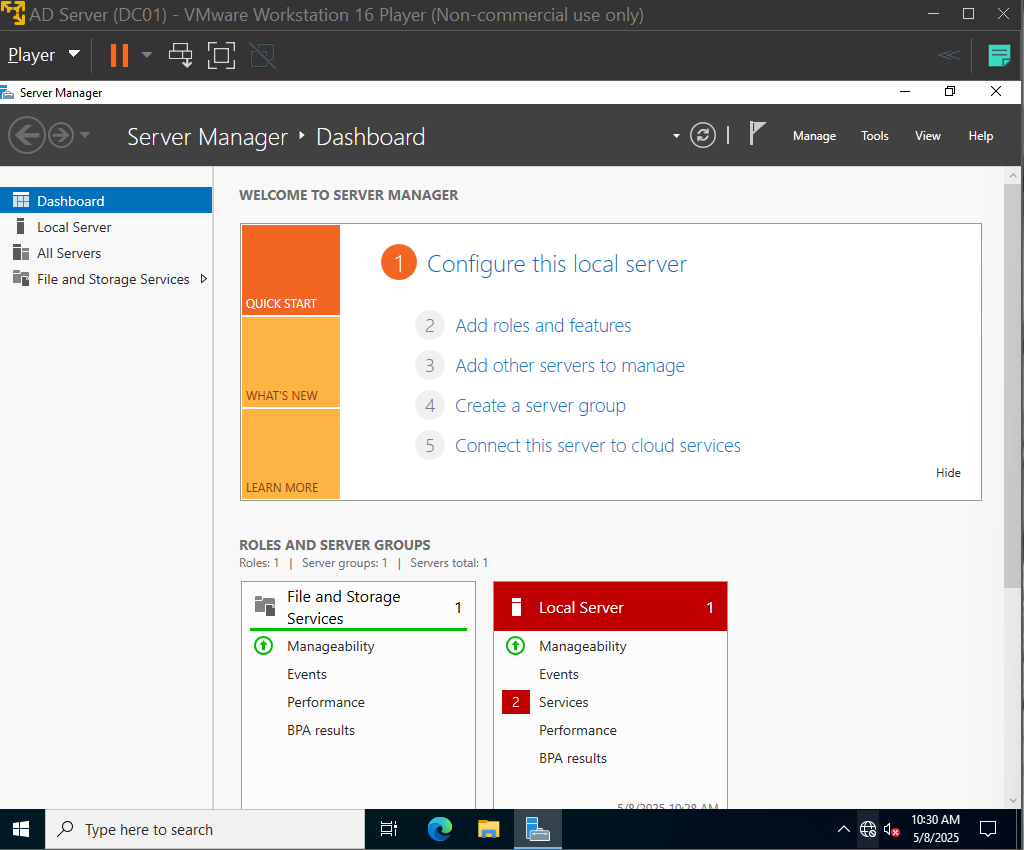
At this point you should have the OS installed, and after booting up, the Server Manager should start. It will look like the image below. We won't do anything here yet, but we will come back later and add roles for the server. For now, we need to move on to naming our computer and assigning and IP and DNS.
4. Naming the Computer, Assigning a Static IP and DNS
After installation, I configured a static IP for the server. This IP will serve as the DNS server for all other VMs. First, let's rename the computer:
- Open Command Prompt as Administrator and type:
sconfig
- This will bring up a menu where you can do a variety of things. We're going to set the IP later (although you can do it from this menu if you want - just look at the steps in the related section). For now just enter "2" and rename your computer to "DC01" because we will be promoting it to a Domain Controller later:

- Reboot the server to apply changes.
Now after rebooting, on to statically assigning the IP to our machine:
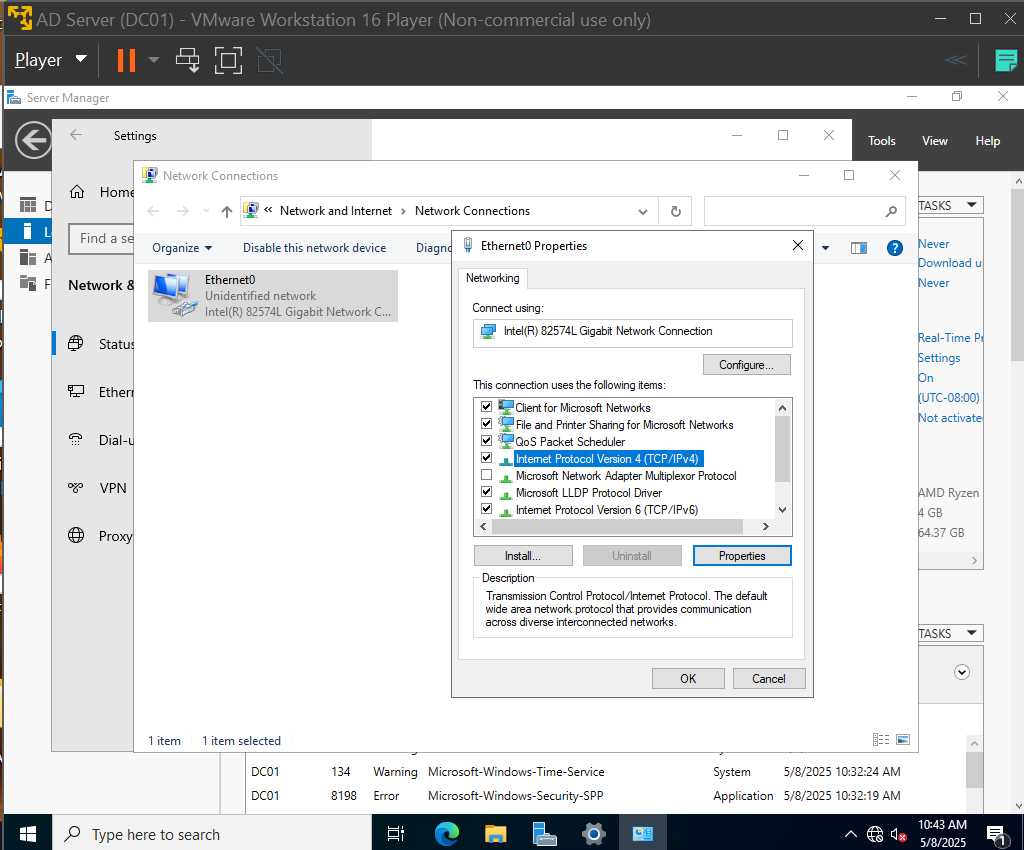
Use the image above for reference. Navigate to Network Connections on your VM and right click the Ethernet connection. Select Properties, and then highlight "Internet Protocol Version 4".
From here, again click the Properties button which will create a pop-up window. Select "Use the following IP address" (you can repeat this same process for static IP assignment for your other VMs as well). Here we will enter in our static IPs, and the DNS server address. The DNS address will be the server's own IP because it will actualy be serving as our DNS server when we add the roles to our server later! You can use your own IP scheme if you'd like. For me, I chose the following:
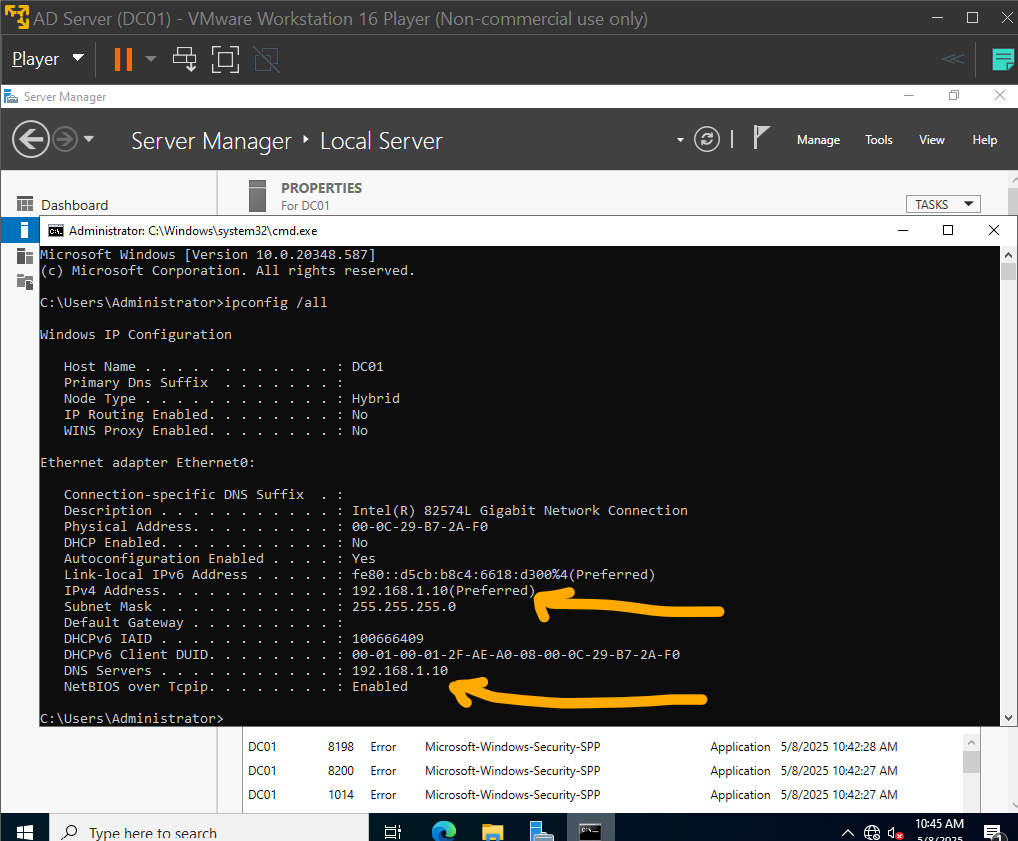
- IP address: 192.168.1.10
- Subnet mask: 255.255.255.0 (should auto-populate)
- Default Gateway: left blank because our connection is local and won't need to be routed to the internet.
- Preferred DNS server: 127.0.0.1 - this is a loopback address, which is a way for the machine to reference itself. It would be like putting the machine's own IP in the blank, but this is used for the machine to know it is referring to itself.
- Alternate DNS server: Again, not communicating with the internet so I left it blank. All of my purposes are achievable locally.
Now, reboot your server VM to apply the IP and DNS changes.
Once it is booted back up, run command prompt (cmd) and run the command ipconfig /all
This will show us if our settings were applied. You should confirm that the IPv4 address and DNS address we assigned matches what is displayed in the prompt window:
If it matches, you should be ready for the next step! Installing the Active Directory Domain Service and DNS roles on your server and creating the domain your workstation VMs will be joined to!
5. Installing AD DS and Creating the Domain
With the server IP and DNS addresses configured, it is time to install Active Directory Domain Services (AD DS) and promote the server to a domain controller.
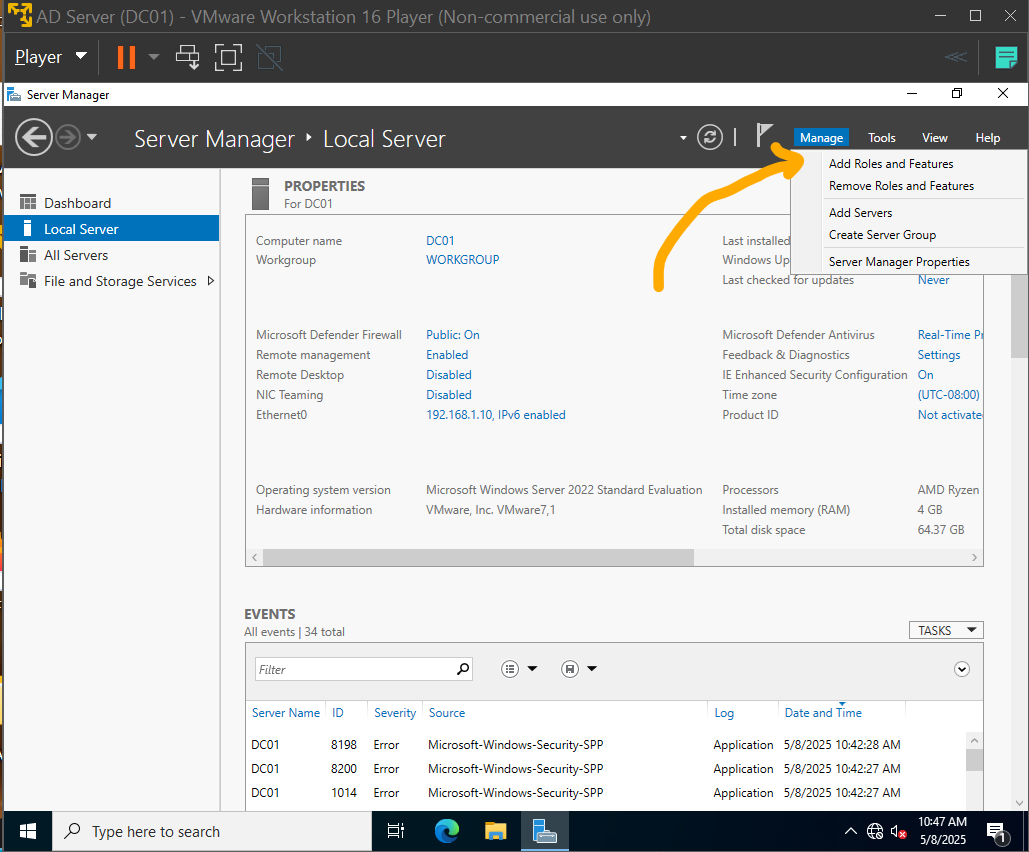
- Open Server Manager if not already open > Manage > Add Roles and Features:
-In the Add Roles and Features Wizard, you will be prompted to select the installation type.
-Choose Role-based or feature-based installation.
-This is the default and is appropriate for installing the AD DS and DNS roles on the server.
-Click Next.
Server Selection:
On the Select Destination Server screen, you will need to select the server on which you want to install the roles.
Since we are installing on the same server (DC01), you will see it listed by its hostname and IP address (e.g., DC01 - 192.168.1.10).
Confirm that it is selected and click Next.
Roles:
On the Select Server Roles screen, you will see a comprehensive list of available roles.
Check the following roles:
-Active Directory Domain Services (AD DS)
-DNS Server

You will receive a pop-up asking to add necessary features for each role. Click Add Features for both.
Features:
The Select Features screen will appear next, but there’s no need to select additional features beyond what was added with AD DS and DNS.
Click Next.
Now just continue through the installation. You will arrive at a confirmation screen.
Confirmation:
The Confirmation Screen will list the roles and features to be installed.
Before proceeding, you can select Restart the destination server automatically if required. This will restart the server when necessary, for example after installing these roles.
Click Install to begin the installation.
Installing and Completion of Installation:
The installation will take several minutes. You can monitor the progress directly in the wizard.
Once complete, you should reboot your VM if not done automatically. After booting back up, a notification with a flag will appear in the Server Manager Dashboard, prompting you to promote the server to a domain controller.
- Click the notification and select promote the server to a domain controller:

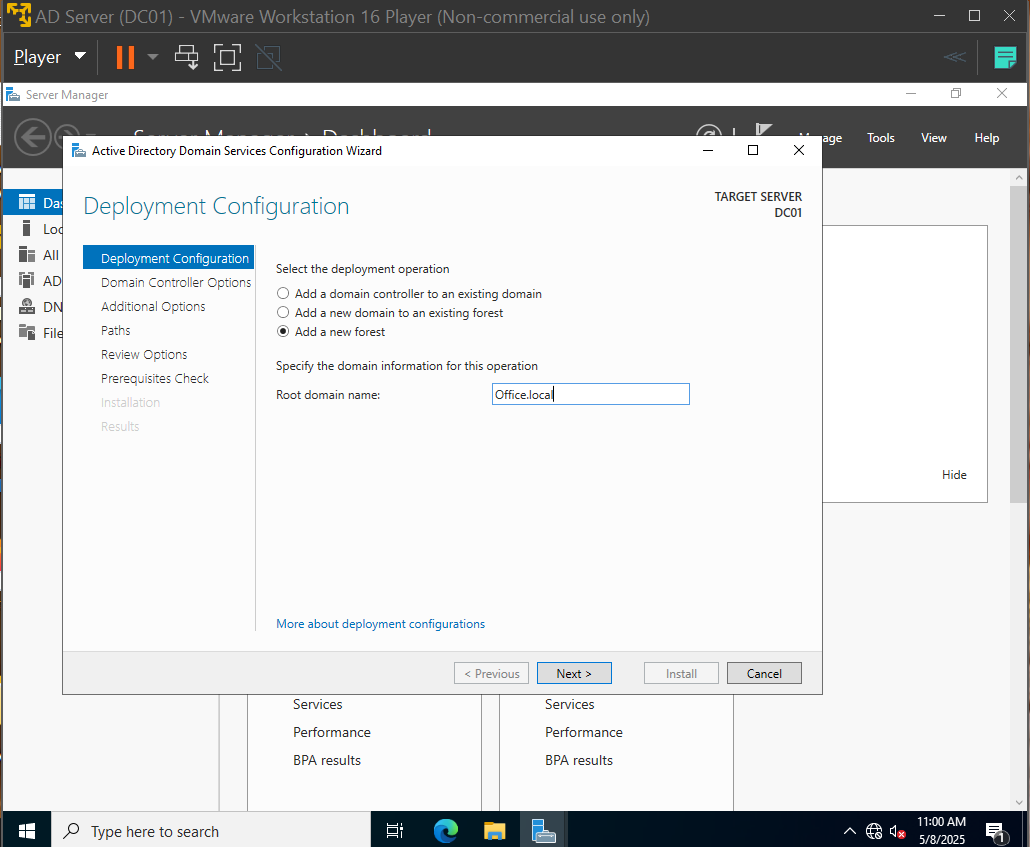
The Active Directory Domain Services Configuration Wizard will open.
Select Add a new forest (since this is the first domain controller in the lab).
Root domain name: you can choose your own, but I chose Office.local.
Click Next.
Domain Controller Options:
On the Domain Controller Options screen, you will configure specific settings for the domain controller.
Domain Functional Level: Windows Server 2016
Forest Functional Level: Windows Server 2016
Domain Name System (DNS) Server: Leave checked.
Global Catalog (GC): Leave checked.
Read-only Domain Controller (RODC): Leave unchecked.
Set a DSRM password:
This is the Directory Services Restore Mode password, used for recovery.
Enter a strong password and confirm it.
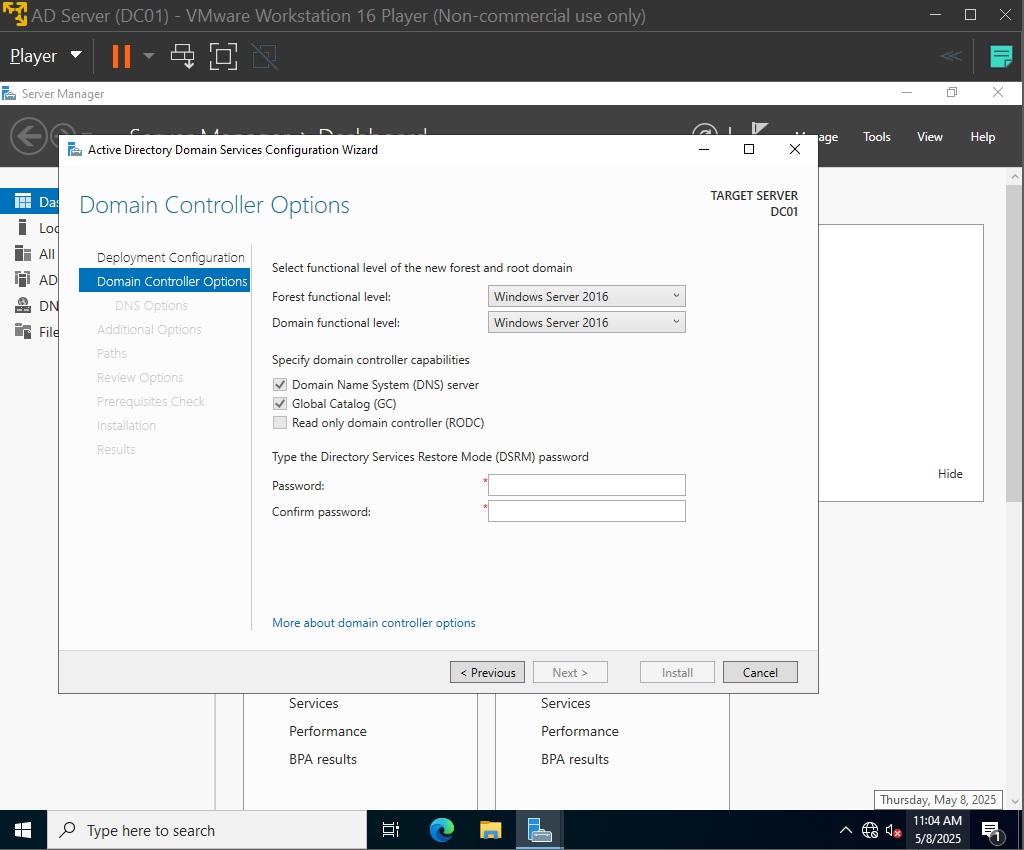
Click Next.
Now, continuing through with defaults should be just fine. You'll come to a prerequisites check:
Review Options and Prerequisites Check:
The Review Options screen provides a summary of the domain controller settings.
Review the settings to ensure they are correct.
Click Next to run the Prerequisites Check.
The server will verify that the required components are installed and configured properly.
If any warnings appear, review them. Common warnings may include DNS delegation (which can be safely ignored in this lab setup).
Reboot Configuration and Installation:
Once the prerequisites check passes, you will see the Install button.
Before clicking Install, you will see a checkbox option:
"Restart the destination server automatically if required."
Check this box to ensure the server restarts automatically after the installation is complete.
Click Install.
The installation process will begin, and the server will automatically reboot once the domain configuration is complete.
Logging Back In as a Domain Admin:
After the reboot, the login screen will now display the domain name:
"OFFICE\Administrator"
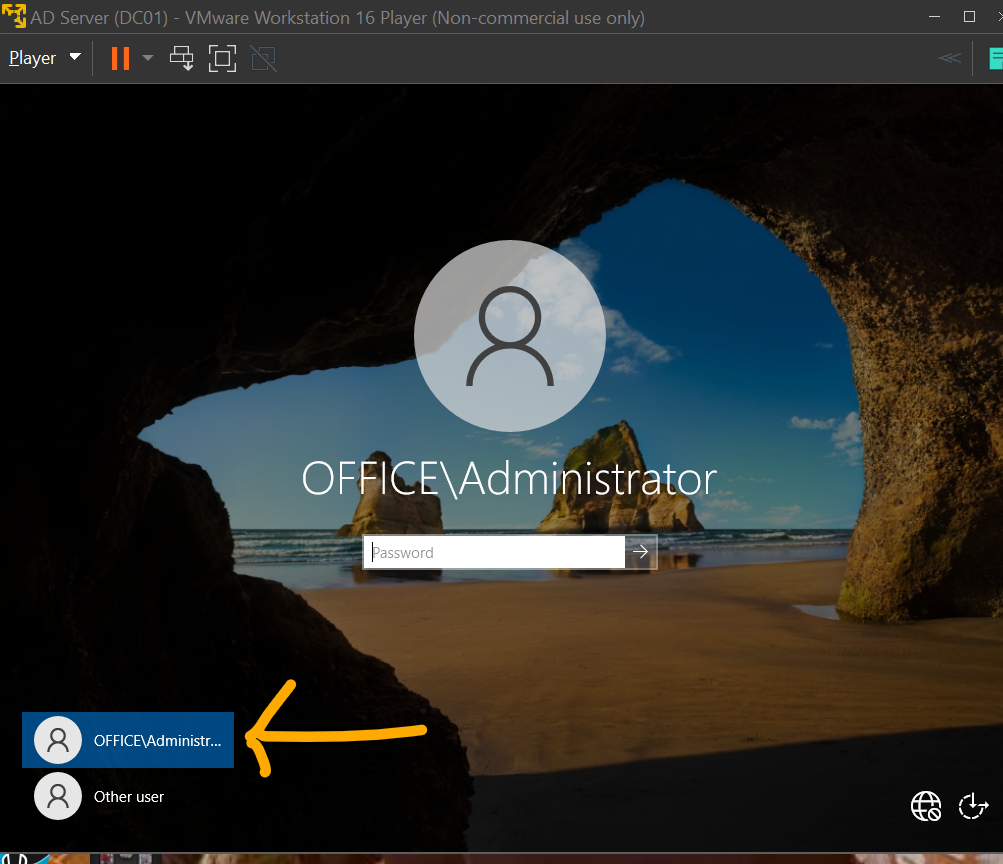
This will be your username to log in, the full title. Enter the password you created for the domain admin account.
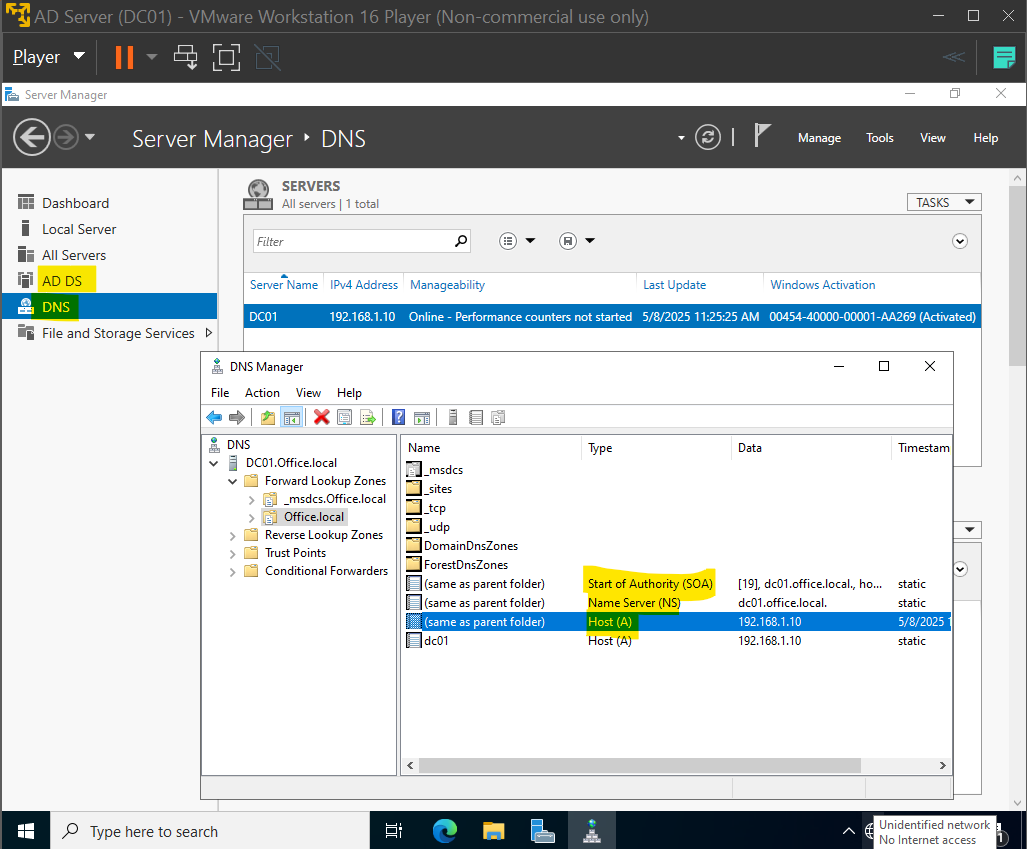
Verifying Domain Controller Configuration:
After logging in, open Server Manager and verify that the AD DS and DNS roles are present and functioning.
You can also check to make sure you have the hilighted DNS records (you should have them after installation and reboot completed) by going into the DNS tab (DNS Manager) > Forward lookup zones > Office.local
Open Active Directory Users and Computers (ADUC) in the Tools tab to confirm that the Office.local domain structure is visible. You just want to make sure you can see Office.local exists.
You can also verify the SYSVOL and NETLOGON folders exist by navigating to:
C:\Windows\SYSVOL
C:\Windows\NTDS
These are just extra checks that ensure your installation went as expected.
Testing DNS resolution of our AD server:
Open up command prompt again. We're going to run the nslookup command which is for DNS resolution.
To do this, in command prompt type:
nslookup [your domain]
So for me, that looks like:
nslookup Office.local
It should resolve to the IP address you set for your server. As you can see, the command resolved to the one I set, 192.168.1.10:
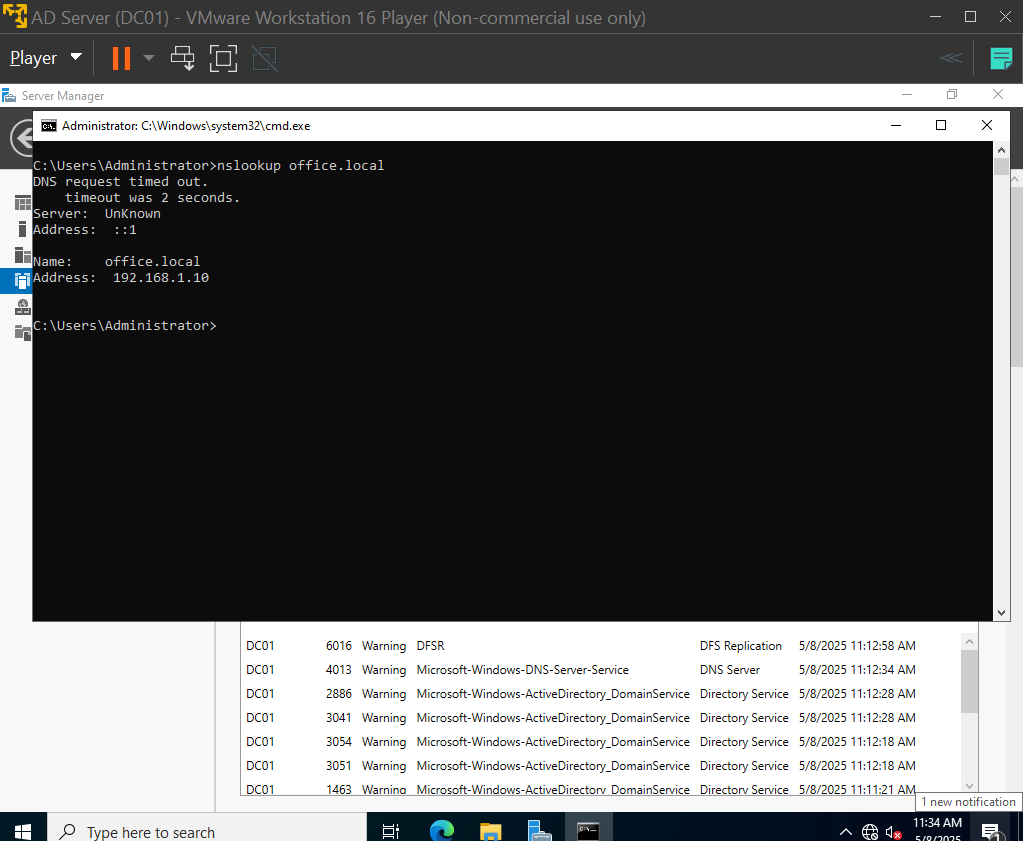
It is because of the existence of those DNS records mentioned previously that this command was able to resolve correctly!
You are finished with getting Active Directory and DNS set up!
We will still need to create Organizational Units (OUs) for organizing our Workstations and HelpDesk users. We will do that after we create some VMs for our users, which is the next step.
6. Creating Workstation VMs
Before setting up Help Desk workstations, I created two general workstations to be added to the Workstations OU (we will create the OU after getting a VM for a user created).
You will need a Windows 10 .iso to set up the VMs. This will be their operating system. Do do this, I had to use the Media Creation tool. It's easy to do, just follow along:
1. Download the Media Creation Tool: Go to the Microsoft Windows 10 Download Page (https://www.microsoft.com/en-us/software-download/windows10) and click Download Now.
2. Run the Tool: Locate the downloaded MediaCreationTool.exe file and double-click to open it.
3. Select Installation Method: Choose Create installation media (ISO file) for another PC and click Next.
4. Choose Windows Version: Select Windows 10 Pro (64-bit) as the edition and English as the language. Click Next.
5. Select ISO File: Choose ISO file as the media type and select a location to save it (e.g., Desktop).
6. Download the ISO: Wait for the download to complete.
Now that you have the Windows 10 .iso, you can easily create a new VM because you've already done it once for the server VM. Just select create a new virtual machine in VMware, name it appropriately (i.e. "Workstation 1 or User1) and use these settings:
- OS: Windows 10 (using Media Creation Tool)
- Storage: 30 GB (single file)
- RAM: 4 GB
- Network: Host-Only
- *Important* Select Windows 10 Pro at installation. The other editions didn't include the ability to join a domain.
First User VM Booting up and Configuration:
With the Windows 10 .iso chosen, the hardware configured, and the OS installed (Windows 10 Pro), your first Workstation should be ready for IP and DNS assignment! During OS installation, you'll have to set a username, password, and answer security questions. Make sure you write it down or choose something you won't forget!
Remember when we assigned the IP and DNS to the Active Directory server? The process is the same for each machine you create:
1. Network Connections > Ethernet > properties > Internet Protocol Version 4 > properties
2. Assign IP for your workstation (I chose 192.168.1.11)
3. Assign DNS server address - this will be the Domain Controller's IP - 192.168.1.10
4. At this point I like to reboot after assigning these values.
5. After reboot, open command prompt and run ipconfig /all again. Check to make sure the IP and DNS addresses are correct.
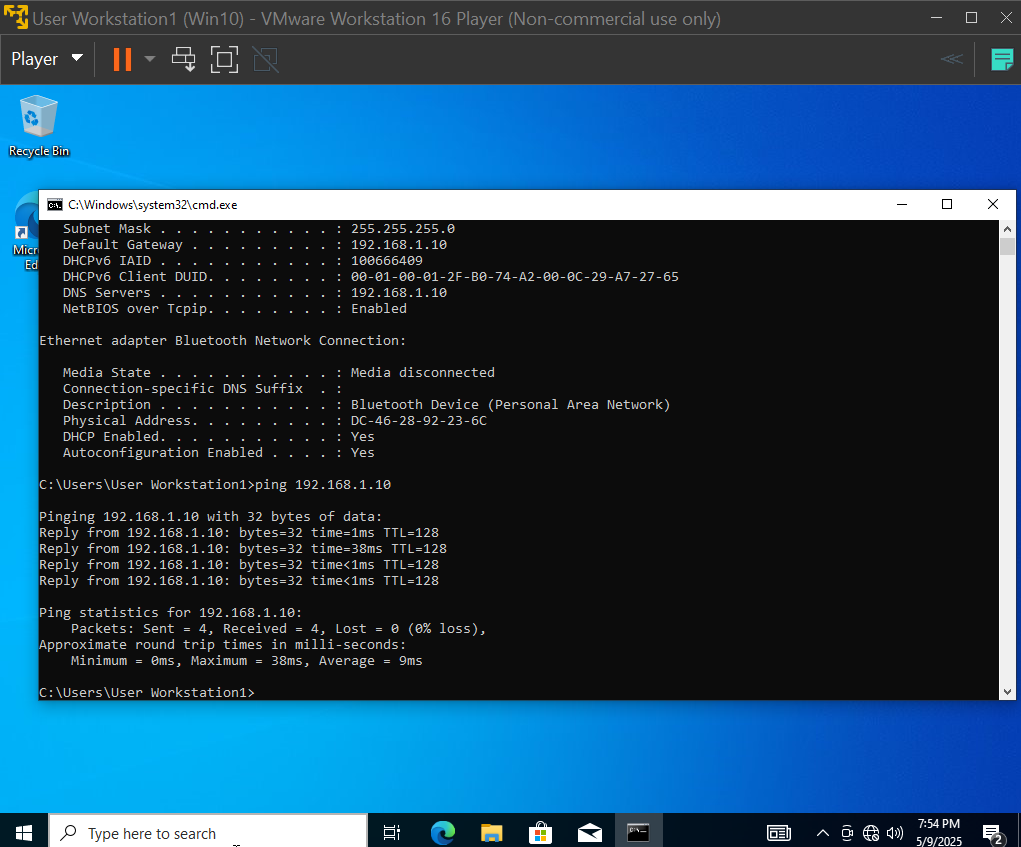
6. With your Active Directory VM on and running a the same time as your User1/Workstation1 VM, try to run the ping command to verify you can reach the server. If you get a response, you've set the DNS correctly:
If you want to try to ping the VM from the Domain Controller, you might need to disable Micrsoft's firewall, Windows Defender. My server could not ping my workstation VM unless I turned it off because it was automataically set to deny ICMP traffic (ping).
7. Creating the Help Desk Workstations and Users
With the first workstation established, I then set up another workstation user and two additional workstations for the Help Desk users. Just repeat the process that you used to create the first VM, but name them appropriately. I named the Help Desk VMs HelpDesk 1 and HelpDesk 2 for my own reference. The others were workstation 1 and workstation 2. Find a naming system that works for you. Go ahead and set up your remaining VMs using the same settings:
- OS: Windows 10 Pro
- Storage: 30 GB (single file)
- Network: Host-Only
- Assigned IPs: 192.168.1.12 (workstation 2), 192.168.1.13 (HelpDesk 1), and 192.168.1.14 (HelpDesk 2)
8. Joining the user to the domain
You'll do this step for each VM after assigning their IP and DNS server addresses and confirming they can ping the server. Since we did this already for the first VM, let's use it for the first VM to join our domain.
To join a user to the domain, go to:
This PC > Properties > Advanced System Settings
You'll have to enter the Admin credentials you created earlier:
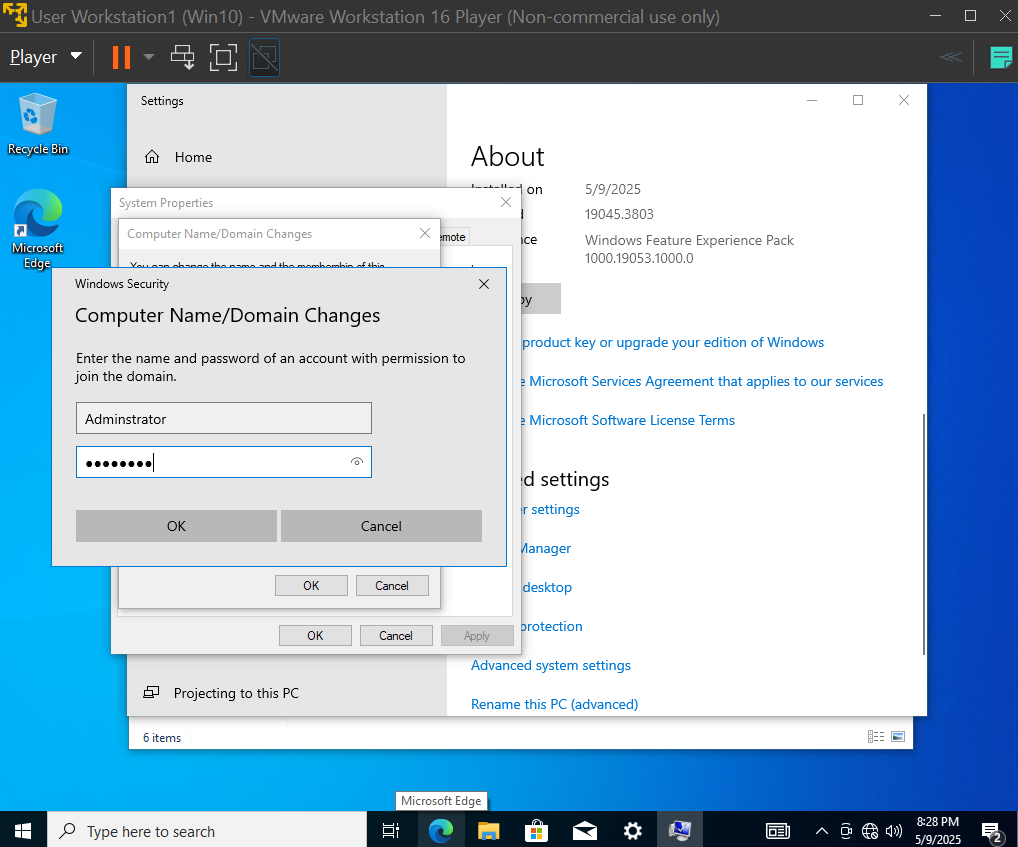
Go to the "Computer Name" tab.
Click "Change".
You will now give your VM a name to be used in the Domain Controller for your reference when adding controls and groups later.
Once you give it a name, select "Domain:" under the "Member of" section at the bottom. Here you will enter the domain you created earlier. My example was "Office.local".

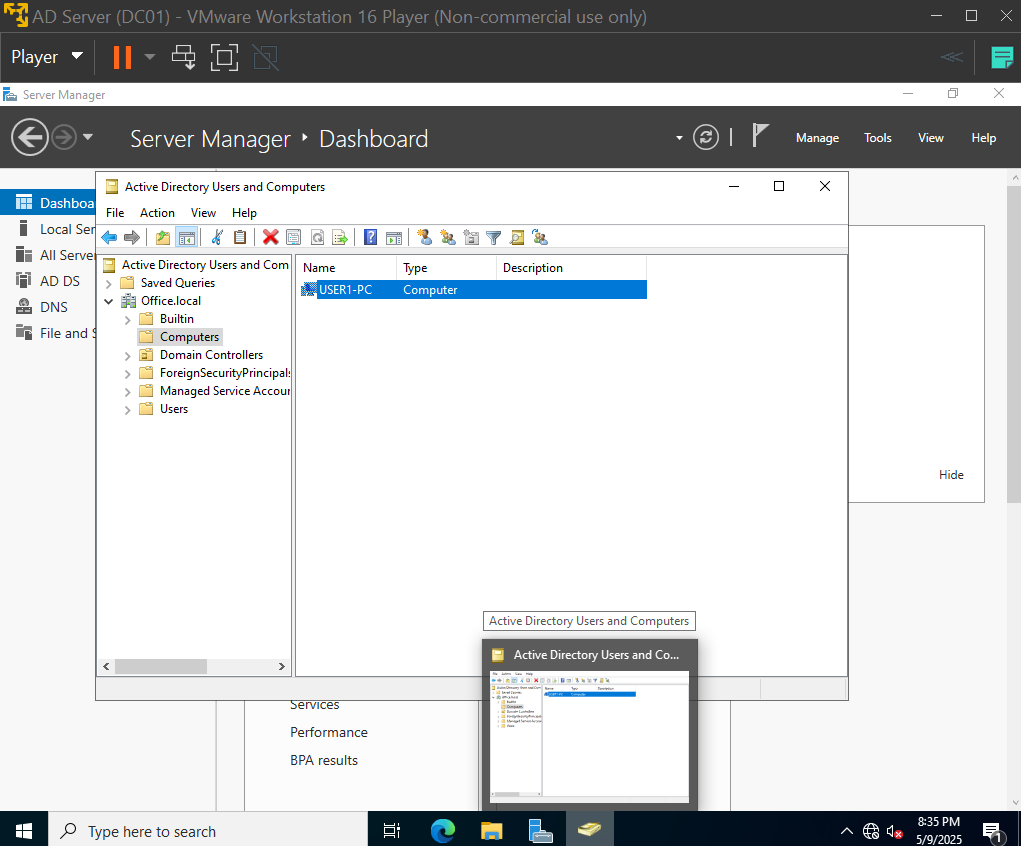
After joining the VM to the domain, you will have to reboot the VM. In your Domain Controller VM, refresh the server using the double arrow icon at the top. Then, go to the top right and select Tools > Active Directory Users and Computers. Check the computers container by clicking it. Your joined PC should now be listed there:
Now, create an Organizational Unit (OU) for the workstation users:
You'll create a separate one for the HelpDesk users later after you set them up and join them to the domain by repeating these steps. For now, right click "Office.local" while still in the Acitve Directory Users and Computers window. Choose New > Organizational Unit. Name your OU something along the line of workstations or however you prefer.
So now your OU is created. Let's add a user to it.
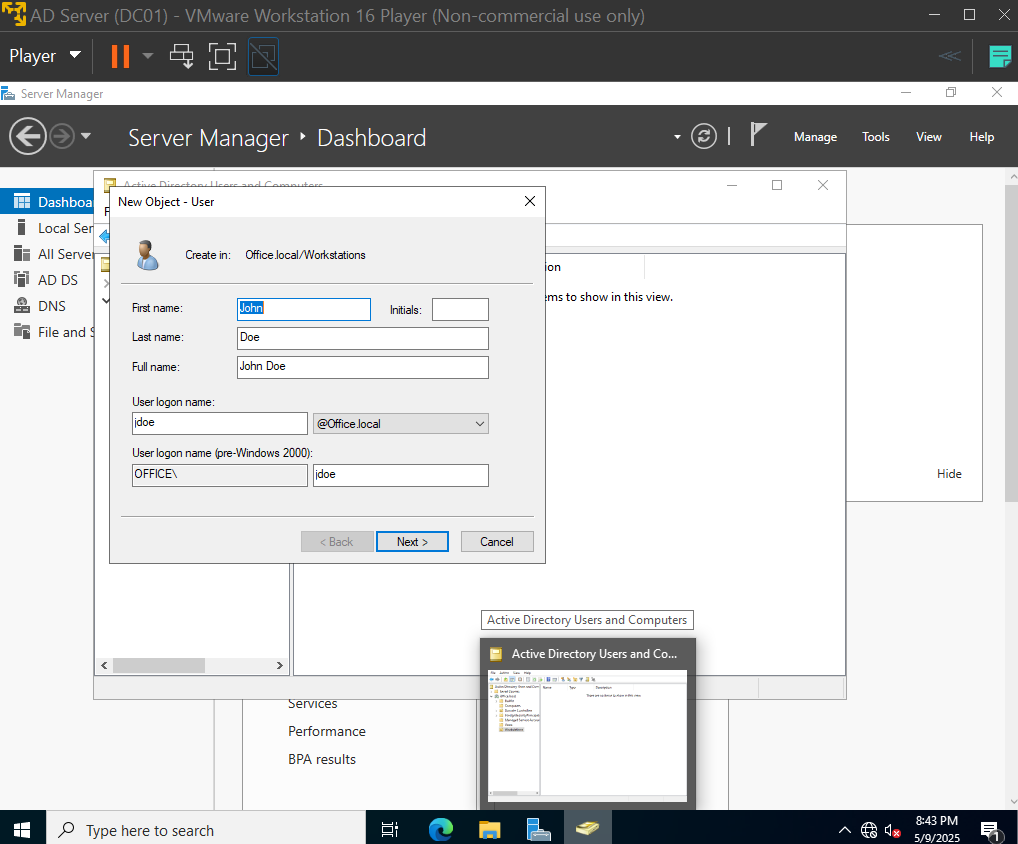
Navigate to your OU, right click in the empty space and choose New > User.
Give the user a name, a password, and select "change password at next log on", so that when we log in as this user to our VM, we can set our own password.
Now go back to your workstation 1 VM.
Log out the admin if admin is logged in. Now log in with the user credentials and password you created. You should be prompted to change your password. Make sure you choose one that you will remember!
The login process should start for the new domain-joined user!
You have now set up a domain controller, an organizational unit, and a user!
To confirm being joined to the domain, with the AD server running, in your workstation1 (now new user) run this command:
ping Office.local
It should resolve to the IP of your domain controller.
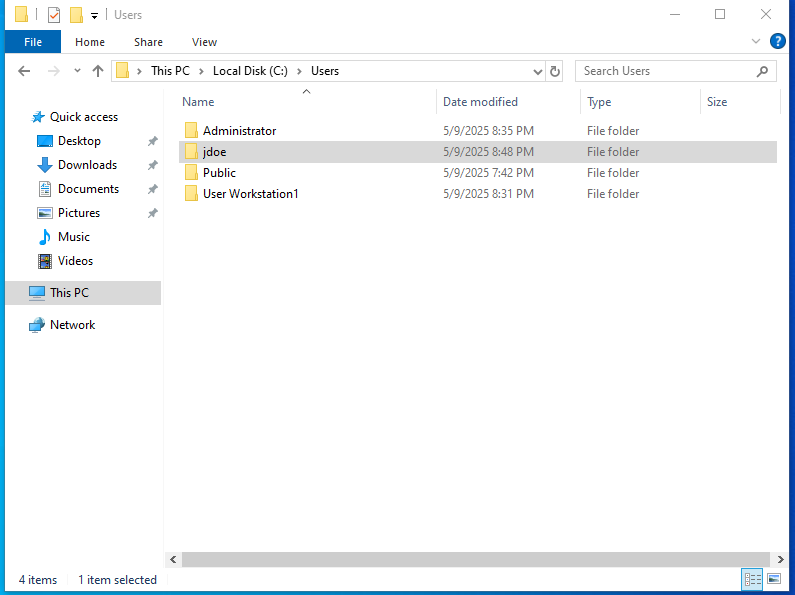
You can also confirm your files have been created by going to the Users file and seeing if your created user (for me it was jdoe) has its files created:
So there you go. You've joined the user to the domain! Just repeat the same process for your next 3 users, Workstation 2, HelpDesk 1, and HelpDesk 2. You'll give them new usernames and passwords, log in with the new credentials, set up their new passwords, and verify connectivity using ping to resolve the IP of Office.local!
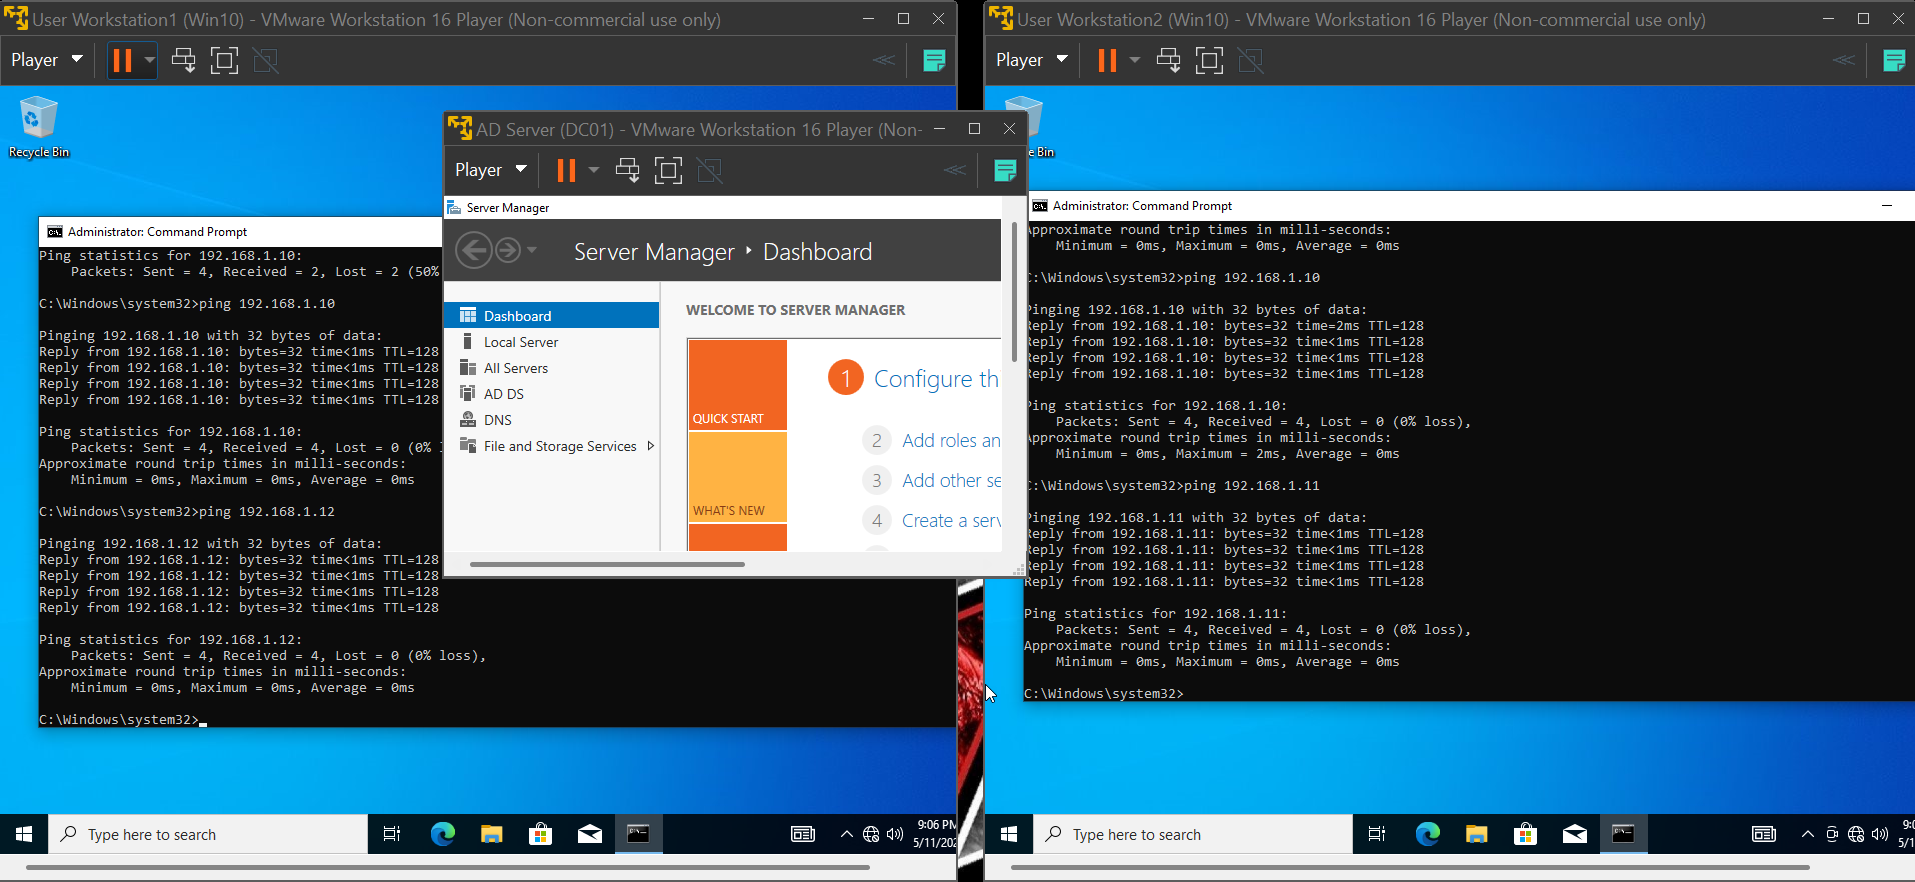
9. Verifying Connectivity and DNS Resolution
We know the VM can ping the AD server, but since all VMs were on the host-only network, they should be able to communicate with each other as well. After getting all users established, you can check if they can reach each other by pinging each other's IP address. For instance, I pinged workstation 2 from workstation 1 and got a successful response. The same was true for pinging workstation 1 from workstation 2. This tells me that they have connectivity:
Congratulations! You've configured an Active Directory server, created Organizational Units, added users, joined PCs (VMs) to the domain, and verified connectivity!
For more users, or OUs, and to join them, just repeat the processes for everything! Don't forget to create a separate OU for your HelpDesk users!
Conclusion – What’s Next?
Setting up this lab taught me valuable skills in domain management, DNS configuration, and user management. Next, I'll be implementing Group Policies, configuring shared folders, and managing permissions. I did not cover those things here because I am actively learning them myself. From here, you should research and explore to try out different functions of the AD server like resetting passwords and applying access controls to different groups!
I wrote this for any new learners in the IT field who were interested in learning about Active Directory, but weren't sure where to start. I hope this helps you get started!
find me on LinkedIn through my portfolio home page and let me know if this helped you, I'd love to connect and network with you!